


How to Use a Clay Bar on Your Car – Plymouth Car Detailing Guide
Clay Bar Car Detailing in Plymouth | How to Clay Bar a Car Step-by-Step
How to Use a Clay Bar on a Vehicle: Step-by-Step Guide from a Plymouth Detailing Expert
If you’re looking to improve the shine and smoothness of your vehicle’s paintwork, learning how to use a clay bar is essential. At our garage in Plymouth, we provide professional car detailing services, and one of the most effective steps in achieving a showroom finish is clay bar treatment.
In this guide, we’ll walk you through how to clay bar a car properly and safely, whether you’re a car enthusiast or simply looking to maintain your vehicle between services. If you’re based in or around Plymouth and need expert detailing, we’re here to help.
What is a Clay Bar and Why Does Your Car Need It?
A clay bar is a soft, resin-like product used to remove bonded contaminants from your car’s paint—things that regular washing can’t eliminate. This includes brake dust, tree sap, industrial fallout, and road grime. These contaminants cling to the surface and make the paint feel rough, dull, and less responsive to waxes and polishes.
Using a clay bar is a key part of paint decontamination, which helps restore gloss and prepare your vehicle for polishing or ceramic coating.
When to Use a Clay Bar on Your Car
You should use a clay bar treatment if:
The paint feels rough after washing.
You notice stubborn marks like tar or overspray.
You’re preparing for waxing, polishing, or ceramic coating.
You haven’t decontaminated the paint in 6–12 months.
Many of our Plymouth car detailing clients request a clay bar treatment before applying protective coatings, as it ensures a smooth, clean surface for better adhesion and longer-lasting results.
Step-by-Step: How to Clay Bar Your Car at Home
Step 1: Wash and Dry Your Car Thoroughly
Before starting any paint correction or decontamination, it’s crucial to clean the car properly. Use a quality car shampoo and wash mitt to remove loose dirt and debris. Rinse thoroughly and dry the vehicle completely with a microfiber towel.
Step 2: Prepare the Clay Bar
Break off about one-third of the clay bar and knead it into a flat, round disc that fits comfortably in your hand. This shape helps you cover more surface area and apply even pressure.
Step 3: Work in Small Sections
Choose a small section to start with—around two feet by two feet. Spray a clay lubricant or quick detailer onto the area and directly onto the clay bar. Never use a clay bar on a dry surface, as this can scratch the paint.
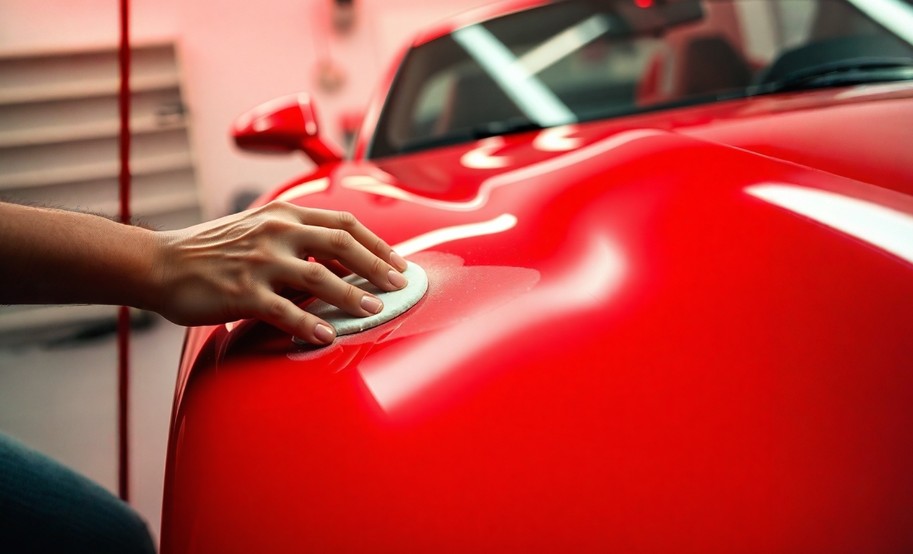
Step 4: Gently Rub the Surface
Using light, straight-line motions, glide the clay bar across the lubricated section. You may feel some resistance or hear a slight rough sound at first—this is the clay lifting embedded contaminants. Keep rubbing until the bar glides smoothly.
Step 5: Wipe and Check the Finish
After claying a section, wipe it down with a clean microfiber towel. Run your hand over the paint to feel the difference. For a more precise check, place your hand inside a plastic bag and gently feel the surface—it should be perfectly smooth.
Step 6: Inspect the Clay Bar
Check the clay bar for dirt buildup. If it’s dirty, fold it over and knead it to expose a clean side. If it falls on the ground, throw it away immediately—dirt particles can scratch your paint.
Step 7: Repeat for the Entire Vehicle
Continue the process panel by panel, always keeping the surface lubricated. Take your time, and don’t rush—this is one of the most critical steps in professional car detailing.
Step 8: Protect the Paint
After claying, your car’s paint will be clean but unprotected. Apply a wax, sealant, or ceramic coating to protect the finish and enhance gloss. If you prefer a professional-grade result, our team at the Plymouth garage offers full paint protection services.
How Often Should You Use a Clay Bar?
Most vehicles benefit from claying every 6–12 months, depending on driving conditions and environmental exposure. If your car is regularly exposed to coastal air, tree sap, or road salt—as is common around Plymouth—you may want to clay more frequently.


